So, you’ve decided to install an in-ground trampoline. You may have heard that a retaining wall is an essential step in putting your trampoline in-ground. Using wood for a retaining wall is a popular choice amongst landscapers and can easily be used to build a retaining wall for your trampoline. However, before committing to a wooden retaining wall there are a few items to keep in mind.
What to Consider When Building a Wooden Retaining Wall
- Water weakens wood – If you live in a place that gets a lot of rainfall and has a high water table, you might think twice about building a wooden retaining wall. Water will ruin and weaken most types of wood overtime and you will find yourself needing to build a new retaining wall to get the most out of your in-ground trampoline.
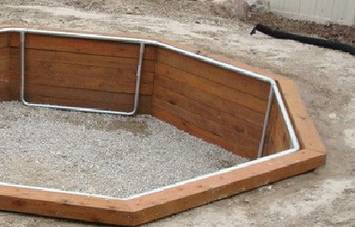
- The wall will be non-circular – Because you will be working with wooden beams, the retaining wall will not be circular. It will likely have many sides creating a polygon similar to a hexagon or octagon.
- The best material – Railroad ties have been a popular choice for landscaping projects for years. They are solid, heavy pieces of wood that are treated to keep bugs away. Because of their uniformity, they are fairly easy to put in place.
- Supporting materials – For wooden retaining walls, there are some other materials you will need for a successful installation. You will need equipment to cut the wood such as a radial saw, a sledge hammer, some steel rods, and a level amongst other items.
Steps to Build a Wooden Retaining Wall
Step One: The first step for installing a wooden retaining wall is to dig the trampoline hole. Ensure that the hole accounts for the width of whatever wood pieces you are using so there is still enough space to drop the trampoline frame in the hole. The hole will need to have a flat, level bottom to begin placing the wooden beams.
Step Two: Cut your wooden beams to size. Use your trampoline frame to determine the amount of sides you will have. Each space between two legs of the frame will be a side of the polygon. Each length of wood should measure the same length. You will also need a sturdy beam to create an edge at every verticy. This piece of wood will not be the same length as the others. You will also need to determine how many beams will need to be stacked to reach the top of the trampoline hole. Once you have all your wood beams cut, it is time to start placing them.
Step Three: Place and secure the beams. Begin by placing a vertical post and securing the adjacent, horizontal posts to it. Use a drill and stakes to secure the horizontal posts to each other. During this process you may need a level to ensure your wall is not lopsided. When placing the beams it is also helpful to use the sledge hammer and stakes to secure the wooden posts in place before they are able to be drilled and screwed together.
Step Four: Attach the trampoline frame to the retaining wall. Secure the retaining wall to the trampoline frame with long screws.
Step Five: Backfill the retaining wall. Just like with any retaining wall, some backfill will be necessary. In order to produce the best results and avoid settling, compact the dirt as it is being added between the dirt wall of the hole and the retaining wall. It is also helpful to use a hose to add water to the dirt so it settles less the next time the yard is watered.
Success! Congratulations! You’ve officially completed your first wooden retaining wall. Remember, if the wood is ever warped and needs to be replaced, there are other materials that may be better suited for your soil. Check out how to install a plastic retaining wall here
Image Source: 16 In Ground Trampoline Retaining Wall Kits and DIY Ideas by Get Trampolines


